The Party Manager allows Partners to view all their parties, status, and details. You can create new parties, edit existing parties, and add orders to parties.
To access from the Partner Portal go to Parties > Party Manager.

To create a new party, click New Party in the top right-hand corner. Creating or editing a party allows you to enter all the details regarding the party directly into the Partner Portal. The user will enter who is hosting, party details, and the party address.
Selecting a Host for a Party
Who is Hosting? – Dropdown with 3 options: I Am Hosting, My Customer, and New Customer.
- I Am Hosting: You, the Partner creating the party in your portal is the host.
- My Customer: The Partner is creating a party for one of their customers to host. When this option is chosen a second dropdown box will appear to search for the customer. Search by entering the first 3 characters of the customer’s name or ID.
- New Customer: Choosing this option will bring the Partner straight to the create new person page to add a new customer before hosting. NOTE: NEVER enter your personal email address on a customer or hostess’ order or account. Your email address is unique to YOU, and by doing so you will change your own personal account details to the details of the account you are adding your email address to.

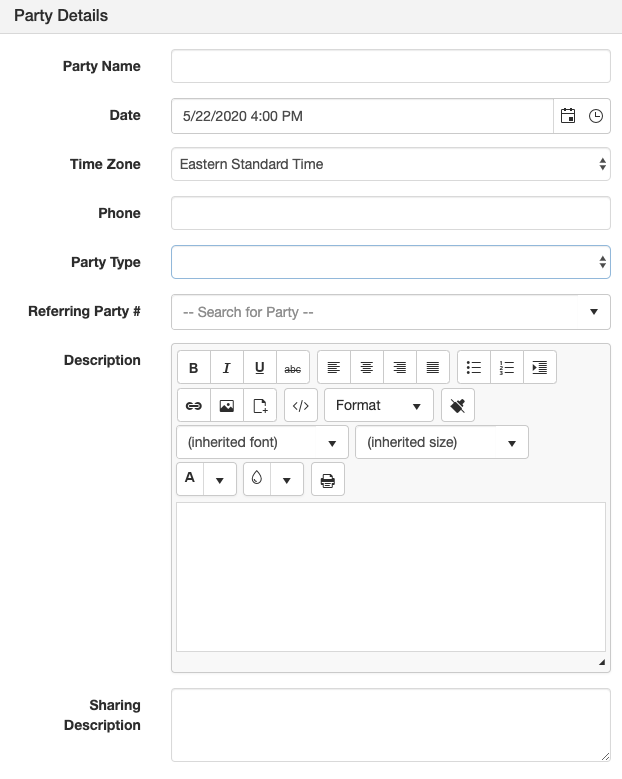
Party Details Creation
Party Name – Choose a name for the new party.
Date – Choose the date and time for when the party will occur. Icons to the right can be used to conveniently select the date and time.
Time Zone – Choose the time zone the party will be hosted in.
Phone – Field to provide a contact phone number.
Party Type – Choose Home Party, Online Party or Vendor Event
Referring Party # – Enter the ID of a referral party ID here (optional).
Description – Enter detailed information relevant to the party being created.
Sharing Description – A brief description that will appear for the party when the party event link is shared on a social site (i.e. Facebook).
Event Image – Add an event image to display with the shared description by clicking ‘Select files.’ This image will be featured by the event on the consultant’s upcoming events page.
Display Event On Customer Website – If this box is checked this event will be shown publicly on the Partner’s replicated website.
Display Event Address – Check this box to show the event address entered above where this event is shown.
Display Event Phone Number – Check this box to show the phone number entered above where this event is shown.
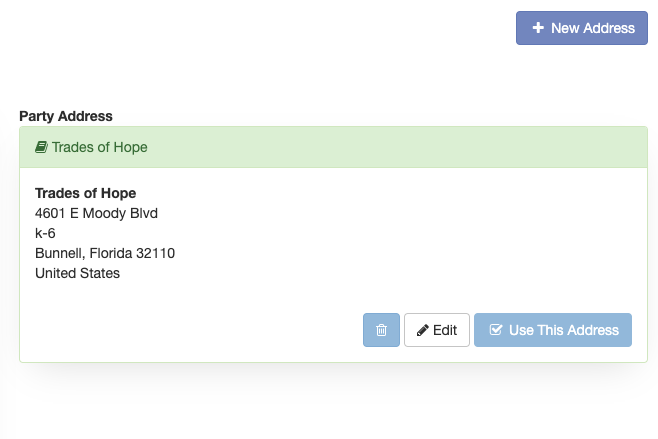
 Party Address
The party host address will automatically be listed as the default address on the host’s record. To choose a different address, click Use This Address from one of the addresses available in the address book for the host’s profile or click New Address to enter a new address for the party.
When all information is complete, click Save Party at the bottom-right of the screen. This will take the user to the Party Details page of the now existing party.
The Party Management page displays all the created parties by a consultant sorted by Party Date. In addition to the party information there are features to the right.
Press New Order to quickly jump to the New Party Order screen to choose a new or existing customer to place an order for a party. Party must be in Booked or Open status.
Press Edit to make changes to the Party Details. Follow the steps above. A user is unable to edit once an order has been placed.
Press Details to be taken to the Party Details and perform any of the 3 steps.
Press Cancel to cancel a party. A user is unable to cancel once an order has been placed.
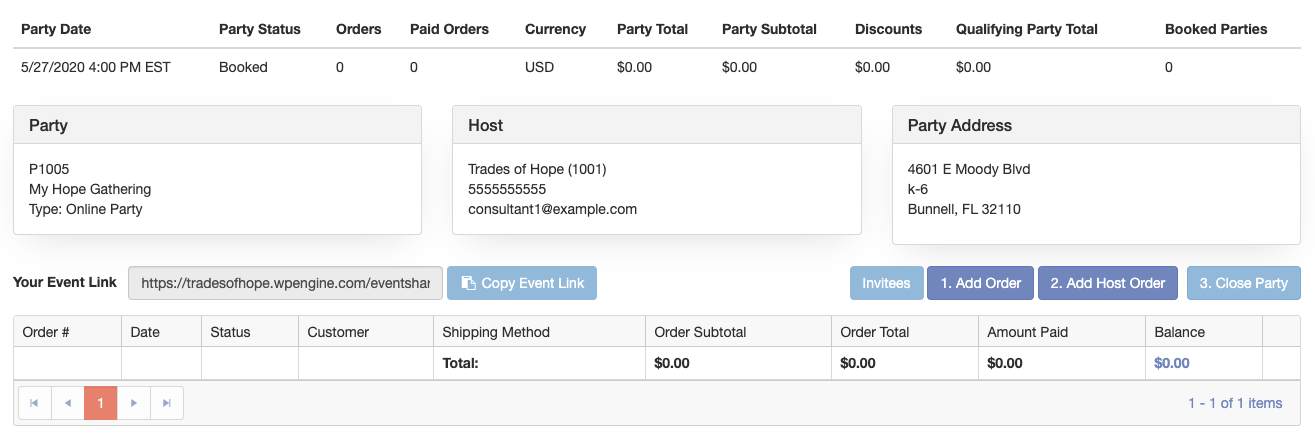
Party Details
The Party Details page shows the information for the party and all the orders placed at the party. There are three basic steps for a party: add customers’ orders, add host order, and close party. Customer orders must be entered prior to the host order to be credited towards host rewards. All orders must be paid in full before a host order can be entered.
Once all party orders are entered, then the host order (the final order) is entered. Once the host order is entered then the party will close. No orders, including host, can be entered once a party is closed. Users can reopen a party in the company portal if a party is closed with no host order or if the party is in cancelled status.
The Party Details page provides the following information:
Party Date – Date and Time the party will be hosted.
Party Status – Shows the current status of the party.
- Booked: Party is created and open to receive new orders. A booked party can be edited or cancelled.
- Open: Party has existing orders associated to the party. An open party cannot be edited or cancelled.
- Open Host Order: The host order can be completed for the party. No additional orders can be added, and the party cannot be edited or cancelled.
- Closed: The party can no longer be edited or have orders added to it.
Orders – Number of orders added to the party.
Paid Orders – Number of orders with a balance paid in full.
Currency – The currency to be used with the party.
Party Total – The total of all order totals in the party, including subtotal, shipping, handling, taxes, etc.
Party Subtotal – The subtotal of all orders in the party (products purchased).
Discounts – The total of all discounts given on orders in the party.
Qualifying Party Total – Party total qualifying for available host rewards. Different configurations can affect qualifying party total such as host rewards, discounts, and products excluded from host rewards.
Your Event Link – Use the Copy Event Link button to share the party link. This will allow shoppers to go directly to the replicated website tagged with the party ID. Orders entered here will appear under the party details for the Party ID it is linked to. NOTE: If you do not have an active Tech Suite/ Replicated Website, you MUST enter all Party Orders through your Party Manager. The Event link provided will NOT be associated with you, your party or your account if you do not have an active Tech Suite. This is important to note to your Hostess, as she will be provided an Event Link that WILL NOT WORK if your Tech Suite is not active. Please be very clear that all orders will need to be sent to you to place through your Party Manager.
PLACING PARTY ORDERS:
Step 1 – Add Order
To add an order under a party, click Add Order on the right-hand side of the party details screen. Placing a new order for a party uses the general shopping process and can be created for new or existing customers. The products displayed during the shopping process will include all items listed as available for party orders and the pricing reflected will be based on customer classification.
Party # – Will automatically list the Party ID.
Host – Will automatically list the host’s ID and Name.
Who is Buying – Use the dropdown to select who will be placing an order: My Customer or New Customer. If New Customer is chosen, then this will take the user straight to the create new customer page before the shopping process.
Customer – If My Customer is chosen above, then enter at least the first 3 characters of the customer’s name or ID to have them appear in a populated search box.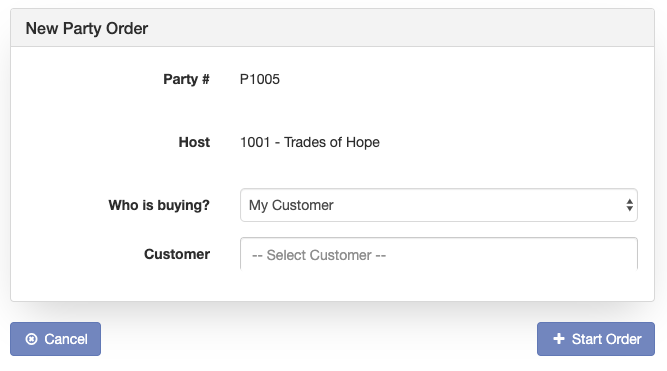
Click Start Order after the customer is selected to begin the shopping process. Proceed as normal with the shopping and checkout process. Repeat for any orders to be added to the party.
Step 2 – Add Host Order
To add a host order under a party, click Add Host Order on the right-hand side of the party details screen. A warning message will pop up asking the host to continue. This is to confirm the host understands that no additional party orders can be added after the host order. The Add Host Order button will only be available for parties in Booked and Open statuses and when all party orders have been paid for within the party.

Clicking on Add Host Order will bring the host to a cart page. The host can submit an order by either going to Continue Shopping or Select My Rewards. Continue shopping will start the shopping process as normal. Selecting My Rewards will take the host to the available rewards offered to the party.
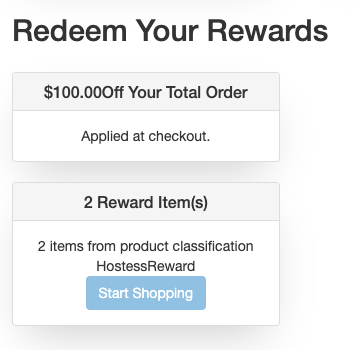
Click start shopping to be taken to the products eligible for the host rewards. Checkout as normal and rewards will display in the process. Once the host order has been placed, the party will automatically close.
Step 3 – Close Party
As mentioned above, the party will close automatically when a host places their host order. If a host chooses to not place an order, then clicking Close Party will close the party.
